Hamburger Pilaff

This recipe comes from the teach your child to cook chapter but on reading it am not sure if I’m teaching her much…

IMG_3228

image

I’m trying to keep up my organised cooking so we looked out everything first. That’s when we realised we didn’t have ham so decided some cooked sliced turkey would do..

IMG_3209

The peppers are optional but my daughter loves peppers so insisted both went in. So the recipes specifies frozen hamburger, so that’s what I bought! I can honestly say I don’t ever remember buying them! I think we did sometimes have them as kids. I was tempted to ignore the recipe and make some but felt that wasn’t in keeping with the recipes intentions!!

So the rice and veg all go into an ovenproof dish..

IMG_3211

Then enough stock to cover..

IMG_3213

Then the lovely hamburgers on top..

IMG_3215

After 45 minutes in the oven the burgers on top are cooked and the rice has absorbed all the stock..

IMG_3221

Not really sure if I’m looking forward to this, although my daughter was intrigued by the idea of a frozen hamburger!! So this was dinner and we both did eat the lot! I had halved all the ingredients except the burgers and only put on one each, but after scoffing the burger she was asking for another!!

IMG_3222

It’s not exactly very exciting and not sure if I’m really teaching my child much about cooking but we ate it and we did enjoy it!

Would I make this again? Possibly, do still have half a box of burgers in the freezer…

IMG_3228

Surprise Shrimp Bake

This recipe is in the teach your child to cook chapter, so I got my daughter in to help with this. She does love to help in the kitchen and I think that’s helped make her quite adventurous when it comes to trying new food!

image

image

So first off we put the eggs onto boil, and then we were using canned shrimps rather than frozen. We opted to just throw the whole can in!

image

Once the eggs had boiled we sliced them and layered in top of the shrimps..

image

Next we got chopping the veg, she insisted I post this photo..

image

So my daughter insists she hates celery, but she was quite happily eating wee bits raw that she had chopped up!

Then we got the celery and mushrooms frying in the butter, and she insisted I post this action shot of her stirring..

image

Once the sauce is done it’s poured over the egg and shrimps..

image

Then rather than faff about with grating slices of bread I just used some breadcrumbs I had in the freezer..

image

After 30 minutes it was looking nicely golden, but I had forgotten to keep back some egg for garnish..

image

It does kind of slop out of the bowl, am thinking maybe the sauce wasn’t thick enough..

image

Well I actually quite liked this!! Shrimps are good, sauce with the mushrooms and celery is good, eggs are also actually quite good in this and then the breadcrumbs add a nice cruncy texture!

So what did my daughter think?? I don’t think she liked it quite as much as me! She did eat it but I don’t think she’d rush to have it again!!

Would I make it again? Maybe..

image

Crispy Stuffed Rolls

I still have some of the braised bacon left and although this recipe says lean boiled ham I decided I could substitute for that. So this is from the teaching children to cook chapter so got my daughter in the kitchen to help!

image

image

We were having this for dinner, it’s maybe not really a dinner dish but more of a lunch or brunch!

I went to the shop with the plan of buying a really crispy roll like a ciabatta or something similar, but I clocked the crispy Scottish morning rolls and decided they would be perfect!!

Once I got them home and started to remove the insides I thought they were maybe a tad soft round the edges. So rather than remove too much of the inside I kind of used my hands to create a hollow!

image

My daughter wasnt too happy that we weren’t actually making the rolls!! Maybe if we’d been more organised we could’ve made some last night!

I did the prepping of the tomato, onion and ham. Decided the use of the boiling water and grater increased the risk of an injury!

The filling was enough and just really involved my daugher stirring the mix

image

Then adding the egg is kind of like making an omelette and again just some stirring for the wee one

image

Then the filling is put into the rolls. I was only making this for me and my daughter so I had sort of halved everything but then only used one egg and one tomato. I was worried it wouldn’t be enough mix but it filled the rolls just fine.

image

Then the lids were pushed back on, excuse the pen marks on her hands, they are clean and these marks are like a permanent tattoo these days!

image

After 15 minutes in the oven the rolls are nice and crisp looking.

image

I can imagine there are many 6 yr olds who would make a bit of a fuss if they were presented this for dinner..

image

I think because she was involved and it is a bit of a novelty thing she tucked in straightaway! Her criticism was that the roll was too crispy, I had to totally disagree and say that the crispiness is brill! The filling is good and and I thought went well with the crispy roll.

It’s not exactly anything fancy and probably more a lunch or breakfast even but we both enjoyed this!

Would I make this again? Yes, was good fun but not really a dinner!

image

Scandinavian Tea Ring

This is another recipe from the teaching your child to cook recipe, but my daughter decided to take an afternoon nap on the sofa and left me to make this! Oh well, thought it sounded like a nice cake to have with tea.

Ingredients

2 tsps dried yeast
1/4 pint warm milk and water
12 oz plain flour
1/2 tsp salt
3 oz butter
1 egg
2 oz dried fruit
4 oz sugar
2 tbsps water
3 oz icing sugar
Angelica and glacé cherries

Sprinkle the yeast on top of the warmed milk, stir in and leave for 10-15 minutes until frothy. Sift the flour and salt into a bowl and rub in 1 oz fat. Break the egg into a bowl and whisk lightly. Make a hole in the flour, then pour in the egg and milk. Using a wooden spoon gradually work in the flour to make a soft dough. Beat well until smooth, cover and leave to rise.

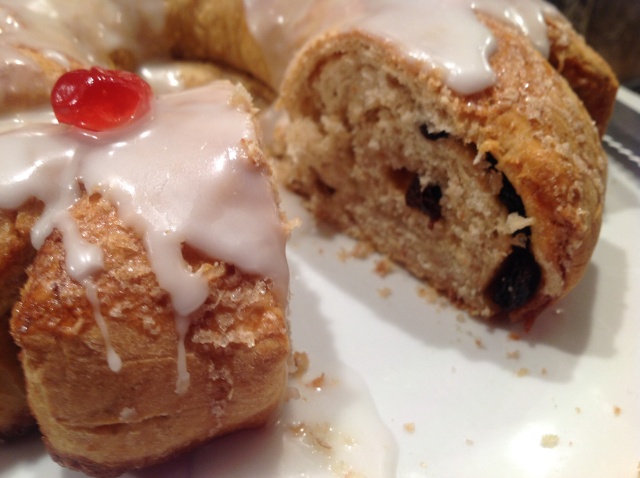
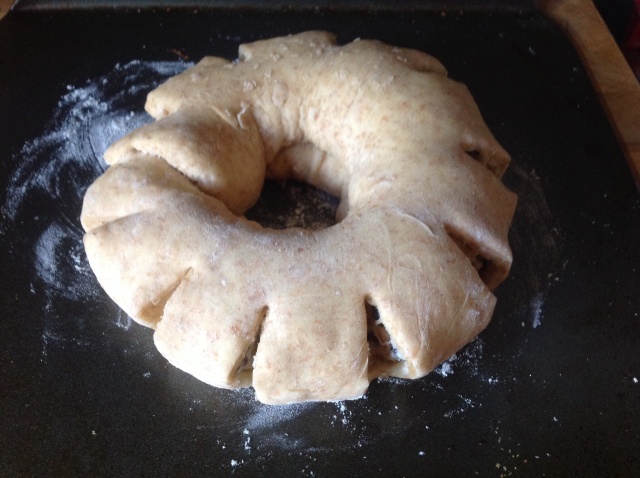
Turn the dough onto a floured surface, knead lightly and roll out to an oblong 8×10 inches. Spread the remaining butter over the dough then scatter over the fruit and 2 oz of the sugar. Damp the edges and then roll up like a Swiss roll, then form into a ring pressing the ends firmly together. Use scissors to make incisions 3/4 of the way through right round the ring at 1/2 inch intervals. Leave to rise again.

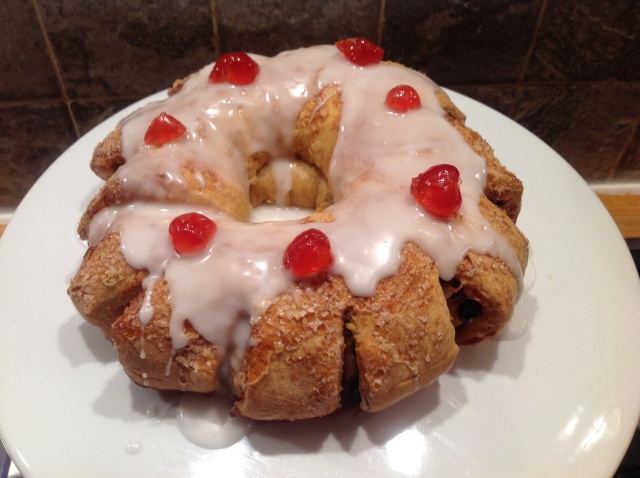
Dissolve the remaining sugar and water and boil until it’s syrupy, then brush over the ring. Bake at 220 for 10 minutes then reduce to 190 for 10-20 minutes. Once golden transfer to a cooling rack. Then sift the icing sugar and gradually add cold water to make a glacé icing, pour over the ring and decorate.

This is a good recipe for the weekend as you can do it in stages. We made the dough this morning and have to say was near impossible to beat with a spoon! We had to get our hands in to get a smooth dough. The recipe doesn’t mention any kneading at this stage, my limited experience of working with yeast was telling me to knead it! I didn’t and it did double in size during the first rise.

I had to do the rest myself at this point! I think the cutting bit was a great idea, gives it a really interesting shape! After adding the fruit and then shaping and cutting I left it to rise for over an hour but it didn’t double in size. I carried on anyway.

image

I think the idea is that as soon as it comes out of the oven you are meant to move to a cooling rack. I had left it for only 5 minutes and the sugar that had poured off it had welded it to the tray! Needed a bit of elbow grease to get it off!

I couldn’t find Angelica, I think it’s a plant but candied Angelia was often used to decorate cakes. I just had to use cherries!

I wanted to have this warm but felt I should let it cool slightly so that the icing doesn’t just pour off, I think it was still a touch warm when I added the icing but I just couldn’t wait!

image

I did really love this, it’s an alternative fruit cake/tea bread. You could reheat to serve warm..

Would I make this again? Yes, would maybe add some cinammon with the fruit next time
image

Casseroled Beef and Tomatoes

This recipe comes from the teaching your child to cook chapter. My daughter does help a lot in the kitchen, but this chapter is about teaching them basic skills and techniques. I have made beef casseroles plenty of times and usually involves throwing in whatever I have a shoving in the oven for a couple hours. This is great Sunday evening dinner..

Ingredients

1.5 lb chuck steak
Salt and pepper
1 onion
1 oz lard or dripping
2 level tbsps flour
0.5 pint stock
1 tbsps Worcestershire sauce
1 lb tomatoes
2 sticks of celery

Cut the meat into 1 inch cubes and sprinkle with salt and pepper. Peel and slice the onion. Melt the fat in a saucepan, add the onion and fry until soft. Remove the onion and put in a casserole. Add the meat to the fat, fry until brown, remove, draining well and add to the onions. Sprinkle the flour into the pan, mix with the fat, using a wooden spoon, and fry until brown. Add the stock and Worcestershire sauce and bring to the boil. Bring a pan of water to the boil, put in the tomatoes and count up to 5; remove the tomatoes and plunge them into cold water. The skins can now be easily peeled off. Cut each tomato into four. Cut the celery in 0.5 inch slices then add the celery and tomatoes to the casserole. Cook at 180 for 1.5 hours.

The recipe goes on to say you can cook it on the stove for longer if you want. I don’t think I was exact with my timing and I was making Yorkshire pudding so I needed to turn the oven up, so I did leave this on a low heat on the hob while the yorkshires were cooking.

I had bought the steak already cut up so didn’t need to do that. I let my daughter do most things under very close supervision! I’m not to keen on letting her cut the veg with the sharp knives so had to step in then. I do think it’s good to teach them about caution in the kitchen as well.

We didn’t use 2 tbsps of flour, after we added the one it was looking really dry, so we didn’t add any more and just went on and added the liquid.

I’ve been doing a lot of tomato skinning since I started cooking from this book, I think that’s the bit she enjoyed the most!!
image

So this doesn’t take too much effort to get it into the oven. I did think that the volume of liquid looked to low, but suppose the tomatoes will break down and release more fluid.
image

I was worried it might dry out but I kept checking it and it looked absolutely fine, no need to add any more liquid. I did cook this for way longer than an hour and a half. I was having a Yorkshire pudding disaster so this had to cook away for a touch longer.

Tastewise this was nice, the meat is lovely and soft and the sauce is really delicious. I just think that it could do with some herbs and maybe a glass of red wine in it. Although it was tasty and we all enjoyed it i do think I’ve made better beef casseroles. I think that the purpose of this chapter is about educating kids so as a basic casserole recipe it’s a great place to start and has many possible adaptations.

Would I make this again? No not exactly like this, does need a bit of something else, but is a good recipe to start with
image

Bacon and Mushroom Patties

This recipe comes from the teach your child to cook chapter. My daughter loves to help in the kitchen and we do often let her. Although there have been a few occasions where she has been banned after making too much of a mess!! There’s been a few occasions where there has been sugar, flour or milk everywhere. So tonight I was going to let her do as much of this is possible..

Ingredients

8oz lean bacon
1 onion
2oz mushrooms chopped
Quarter tsp dry mustard powder
Pepper
Beaten egg
2oz lard

Mince the bacon and onion, or chop finely. Mix bacon, onion, mushrooms, mustard and a shake of pepper. Add enough egg to make the mixture bind together. Turn onto a floured board and shape into 8 cakes. Fry in the hot lard for 6-7 minutes, turning occasionally.

I started this off for my daughter by mincing the onion and bacon in the food processor. Rather than beat the egg separately I let her break it straight into the bowl; she enjoys that bit!
image

So one full egg was enough to bind the mixture together. The next bit involved us getting our hands dirty which I think she found a bit yucky but then got into the hang of it and actually managed to prepare some decent looking patties!
image

There was a bit of a mess at this stage but nothing that can’t be easily wiped up. So these are meant to be cooked in lard, and 2oz of lard is an obscene amount. I had bought lard for an earlier pastry recipe so thought I would use it but simply could not bring myself to use 1oz never mind 2oz! The amount I used was enough as there is some moisture released from the patties as they cook.

We don’t often fry stuff (I say that after having fried pancakes last night!!) but when we do it’s usually olive oil we use. I made another phone call to my gran and she did say that they used lard a lot for cooking back then. We did cook these for longer than 8 minutes and we carefully turned them together.

Taste wise these are good, not really a gastronomic delight but nice enough for a Tuesday night. The bacon is really strong so next time I would cut that back and maybe add some breadcrumbs and herbs instead. We enjoyed them and they did all get eaten – I had made the full quantity.

Would we make these again? Yes but with a few adjustments!
image

Chocolate buns

There is a chapter in the book on teaching your child to cook. There are various sweet and savoury recipes, I read them all out to my daughter and rather unsurprisingly she picked these!

Ingredients

2oz self raising flour
1oz cocoa
2oz margarine
2oz caster sugar
1 egg
2-3tsps water

4oz icing sugar
2oz butter or margarine
1tsp vanilla or 2 tsps instant coffee

Heat the oven to 180. Sift the flour and cocoa. Cream the margarine and sugar until pale and fluffy. Break the egg and whisk with a fork. Add the egg to the sugar mixture 2 tsps at a time, beating well. Fold in half the flour mix with a tablespoon, then add the remaining flour and cocoa and sufficient water to give a mixture soft enough to drop easily from the spoon when this is shaken. Put a good tsp in each paper case and bake for 15-20 minutes until well risen and firm. When the buns are cold cut a round from the top of each with a pointed knife. Make the butter cream, sift the icing sugar, add the butter and cream well until smooth. Add the vanilla or coffee mixed with water. Place 1 tsp of the icing in each bun. Replace the tops.

My daughter really likes to help in the kitchen, she is only 5 so a bit limited in what I let her do! Whenever she gets involved it usually results in a bit of a mess. For this though I pretty much let her do everything, I think the reason there was actually very little mess is because we were cooking with chocolate and she didn’t want to spill a drop.

image

image

This is really easy and quick recipe to get children involved in the kitchen. We had good fun doing this together, as you can see she even has the essential accessories for cooking!

I only had to take over a couple of times, I didn’t let her use the knife to cut the tops off the cakes, and I helped with the beating and transferring into the cases. These were smelling brilliant while cooking, one thing lacking was patience! Had to leave to cool before putting in the icing. Then I guess one of the perks of helping is getting to lick the icing spoon!

These were quite tasty, really chocolatey. I thought they looked a bit heavy as they came out the oven but once you bite into them they are actually quite light inside. I think it’s fair to say that these are not going to last long, 30 seconds after finishing her first one she asked for another!

Would we make these again? Yes, good fun and easy to do
image